Use Zapier with arpReach

How do I use Zapier with arpReach?

Using Zapier + arpReach API to add your contact’s details into arpReach takes your email marketing automation to a whole new level and opens up a whole new world of profitable possibilities and opportunities.

Here are just some of the services arpReach users can integrate with by using Zapier:

LinkedIn
GoToMeeting
Stripe
Pipedrive
TypeForm
SurveyMonkey
WooCommerce
Freshdesk
Gravity Forms

… plus over 500 other apps.

This is how to do it:

In order to create a public service Global Zapier app, it is a requirement to have a fixed or static URL.

Because arpReach is a self-owned autoresponder software that you install on your own servers, we can’t develop a Global Zap app. The great news is, you can build your own arpZap in just 4 simple steps.

You can get started by following the instructions on our blog: The arpReach Zap.

Extend the login duration

How do I stay logged in to arpReach longer?

At times, composing/working on a message takes time and hitting on save logs you out without saving it or any of the changes you made.

Modifying the session length will help ensure that you won’t be kicked out within a set time that is reasonable to you.

This is how to do it:

The session length is a PHP configuration setting and usually defaults to 15 minutes. Your web host can change it, but you can’t within the arpReach user interface, so you need to contact them for assistance.

All PHP software suffers from this, so we always suggest that users copy all the text to the clipboard before they hit save. Then, if there is a problem, you can simply paste it back.

Remove a registered domain

How do I change or remove a registered domain/sub-domain from my arpReach license?

If you need to remove an associated domain from your arpReach license domain allocation, we require an administration fee of $35 (per domain/sub-domain you require to be removed) to be paid.

This is how to do it:

Pay the $35 administration fee by clicking on the ‘Buy Now’ button on this page:

https://www.arpreach.com/domainremoval

Ensure you input your arpReach license number in the Notes field of the PayPal payment process and complete your payment.

Once paid, open a support ticket:

http://support.arpreach.com/support/home

… with your domain removal request and a copy of your PayPal receipt and/or transaction ID.

Your request will be processed within 24 hours (Mondays – Fridays).

If you need to remove more than one (1) domain/sub-domain from your domain allocation, submit a support ticket and we will be providing you a special link where you can pay for the amount needed.

Important note: Orders for license updates are not refundable.

Move arpReach to HTTPS

How do I move my existing non-secure arpReach installation so it’s on HTTPS?

There are many reason why you might want to ensure that your website has an SSL:

It protects your website from breaches and other threats
Increases your credibility and email reputation
Develops trust between you and your customers knowing that their privacy is also important to you

… and so on.

Since having a secured website has already become a standard, you may be wondering how you can have your arpReach system on SSL.

Here’s a typical scenario:

You just added an SSL certificate on your website and noticed that your arpReach system is still unsecured and the links on your messages are still non-HTTPS links.

This is how to do it:

1. Make sure the domain/sub-domain arpReach is installed on uses SSL (https) for all its pages

2. Go to your arpReach installation directory

For example, if you access arpReach on:

http://www.example.com/a

… the installation directory would be:

public_html/a

3. Open the CONFIG.PHP file and edit the application URL to indicate the correct URL value (http > https)

That’s it! After you save it, your arpReach installation and the system links on all your messages should already be on HTTPS.

Manage multiple websites in one arpReach system

How do I manage campaigns for multiple businesses and websites in one arpReach installation?

Being able to manage campaigns for multiple businesses and websites in one arpReach installation would not only save you money, it may also save you more than enough time to focus on other aspects of your businesses.

Here is a sample scenario:

You run two animal clubs and want to use just one arpReach installation to manage the campaigns for both.

This is how to do it:

1. Pick a domain to use

If branding is important to you, you need to install arpReach on a domain that is generic enough to cover both animal clubs.

When your contacts hover/click on any of the system links you’ve added to your messages (e.g., unsubscribe link, manage subscriptions link, etc.) and if you choose to send messages in text only format, your contacts will see the domain where the message came from (i.e., where arpReach is installed).

For example, if you install arpReach on:

dogsonly.com

… and also use it to manage campaigns for:

catlovers.com

… both group of contacts will see that the messages are actually hosted on dogsonly.com.

In this case, you can use a generic sounding domain like:

animallovers.com

Important note: If you prefer your contacts to see the system link URLs to be on the same domain where they signed up, or whatever domain is applicable to them, then you need to have a separate arpReach installation for each of them.

2. Create and set up an organization outline for each group

All you really need to do once you have arpReach installed is to figure out the structure or organization outline for both groups/clubs and set them up in a way that would be easily identifiable to whoever will be accessing the system.

For example:

dogsonly.com

catlovers.com

3. Start using arpReach

You may now start adding your autoresponder messages and contacts for each club.

Customize user-facing pages

How do I customize the user-facing pages to reflect my brand?

User-facing pages are the external system pages that your contacts see whenever they attempt to subscribe via a web form (if you do not have any custom pages set for it) or whenever they click on any of the system links (e.g., unsubscribe link, manage subscriptions link, etc.) you’ve included in your messages.

In order to provide a consistent brand experience to your contacts, you may choose to customize these pages.

This is how to do it:

To customize all user-facing pages, go to your arpReach installation directory and edit the file:

/application/views/external/external_template.php

The CSS files for the existing themes are in the directory:

static/themes/

You can choose to edit any of those CSS files, but we suggest you stick with just using the styles.css in the custom folder, just so that the defaults will still be readily available should you choose to revert to them in the future.

Customize ‘Manage Subscriptions’ and ‘Edit Contact Information’ pages

To further customize the Manage Subscriptions and Edit Contact Information pages, edit the files:

/application/views/external/external_manage.php
/application/views/external/external_edit.php

Change the language of the user-facing pages

You will also find the language strings for the user-facing pages in the file:

/application/language/english/external_lang.php

Remove “Powered by arpReach” footer

If you wish to remove the “Powered by arpReach” footer on all user-facing pages, edit the file:

application/views/external/external_footer.php

Important note: You will be able to edit how the pages actually look like, but not the contact fields/information available. Also, customizing any script is at your own risk! We do not support issues that resulted to customized scripts, so we strongly suggest you create a backup file prior to making any changes, just so you have one available in case something goes wrong.

Track the source of clicks

How do I track which messages the clicks came from?

Tracking the  source of your clicks helps you determine which of your campaigns are actually working. It allows you to improve on the campaigns that are failing and double down on the areas that are generating you more audiences.

Here is a typical scenario:

You are launching a new blog and want to be able to see which campaigns generate more visitors.

This is how to do it:

Basically, just create separate trackable links (for the same link) for each source. (See How to create trackable links)

For example:

Trackable Link 1
— Name: Blog on Broadcast010
— Tag: blogbroadcast010
— Description: Blog link on Broadcast 010, subject: Hello!, sent 20210101
— Web page to redirect to: https://yourdomain.com/blog

Trackable Link 2
— Name: Blog on Active Members Message 001
— Tag: blogActiveMembersM001
— Description: Blog link on Active Members Message 001
— Web page to redirect to: https://yourdomain.com/blog

Remove failed subscriptions from an autoresponder

How do I remove contacts whose subscription to an autoresponder failed?

arpReach will automatically update the status of a contact’s autoresponder subscription to ‘Failed‘ when any of the following occurs:

A hard bounce is received
The soft bounce limit (you’ve set for that autoresponder) is reached

The system will not automatically remove contacts with failed subscriptions from an autoresponder. You, however, have the option to manually remove them.

Here’s a sample scenario:

You have an autoresponder (Active Members) that serves as a newsletter for active members of your organization.

You want to filter the contacts whose subscription to that autoresponder (Active Members) failed so you could:

1. Add them to the suppression list
2. Move them to another autoresponder (Failed Subscriptions)

This way, you can make sure that they will no longer have any effect on your deliverability rate and so you can have a much clearer active VS cancellation figure.

This is how to do it:

1. Create the Failed Subscriptions destination autoresponder and set its status to Sending Paused or Disabled (See How to create autoresponders)

2. Create the segment (Active Members: Failed) that will filter those failed subscriptions (See How to create segments)

You only need to set one criteria for this segment:

— Match type: Subscription
— Autoresponder: Active Members
— Status: Failed
— All contacts must match: Ticked/chosen

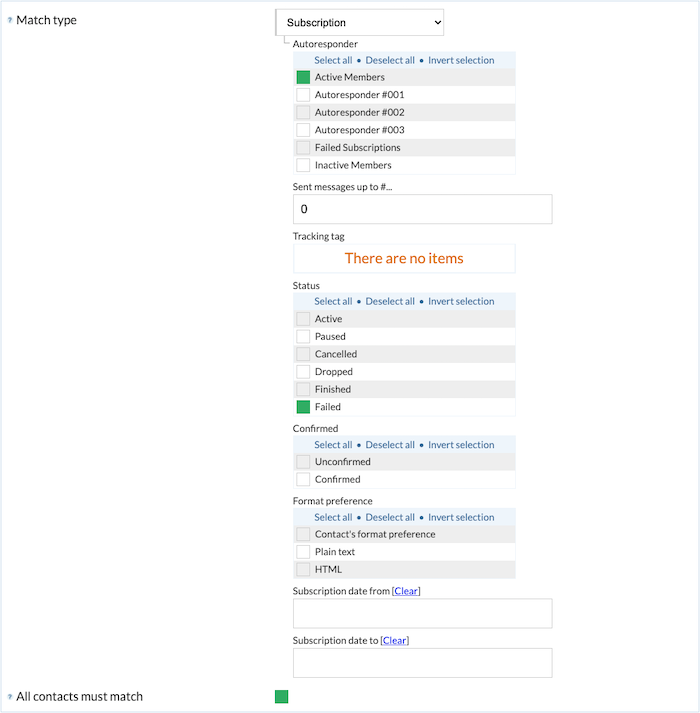
You can leave the rest of the fields as is.

3. Create an action (FailedSubs: Suppression List) that will allow you to easily add them to the suppression list (See How create an action)

Since we will be using the ‘Trigger Action for matching contacts‘ feature (See How to update contacts in bulk), you can choose any of the options on the ‘Event‘ field since what’s important is that you set the ‘Action‘ type to ‘Add to suppression list‘.

However, keep in mind that any contact that triggers that event (regardless if it is for this purpose/scenario or not) will be added to the suppression list. So it is advisable that you use an event type that you never really use (e.g., Remote call) or create an event/trigger solely for the purpose of this scenario (e.g., create a form for the Failed Subscriptions autoresponder and set the ‘Event‘ type of this action to ‘Subscription form submit‘.

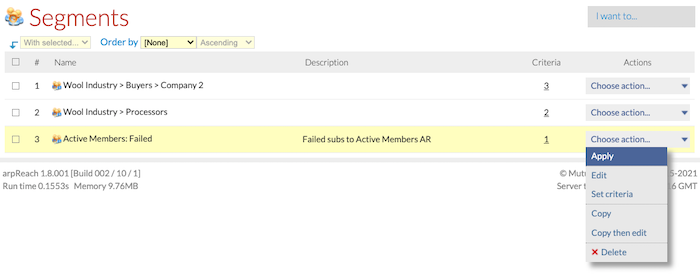
4. Filter your contacts using the segment (Active Members: Failed) you created

You can either choose ‘Apply‘ from the ‘Choose action…‘ drop-down menu (when on the Segments list screen):

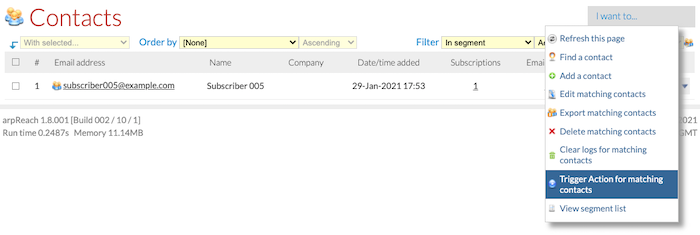
… or choose ‘In segment‘ / Active Members: Failed from the ‘Filter‘ drop-down menu on the Contacts list screen:

TO ADD THEM TO THE SUPPRESSION LIST

5. Once the filter is in place, click on the ‘I want to…‘ drop-down menu and choose ‘Trigger Action for matching contacts

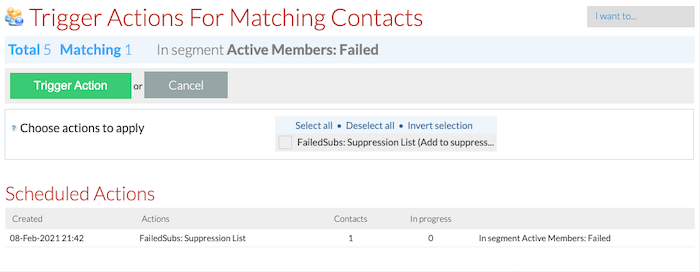
6. On the ‘Trigger Actions For Matching Contacts‘ screen, tick/choose the FailedSubs: Suppression List action you created and click on the ‘Trigger Action‘ button

The action will then be added to the ‘Scheduled Actions‘ list and will be processed during the next (cron) run of the arpReach script.

TO MOVE THEM TO THE Failed Subscriptions AUTORESPONDER

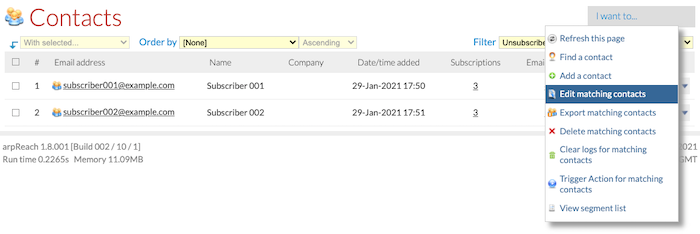
7. Go back to the Contacts list screen (the same filter should still be in place) and, this time, choose ‘Edit matching contacts‘ from the ‘I want to…‘ drop-down menu

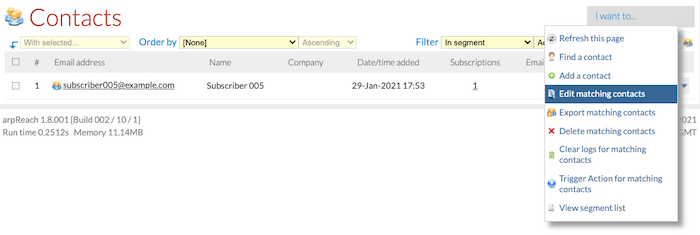
8. On the ‘Edit Matching Contacts‘ screen, select the following under the ‘Subscription‘ section

  • For autoresponder: Active Members (the originating autoresponder – where you are removing them from)
  • Move to this autoresponder: Failed Subscriptions (the destination autoresponder – where you are transferring them to)

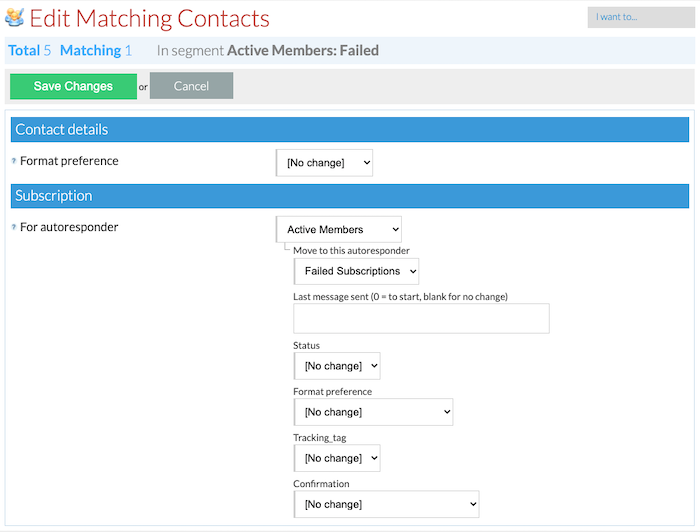
You can leave the rest of the fields as is and click on the ‘Save Changes‘ button.

Once done, the contacts with failed subscriptions to the Active Members autoresponder will already be on the suppression list (assuming that the next cron has already run):


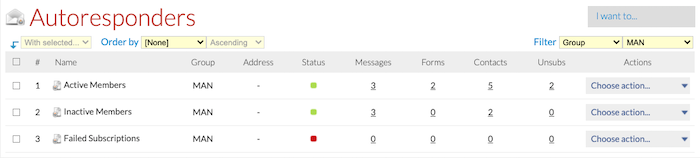
… and moved to the Failed Subscriptions autoresponder:

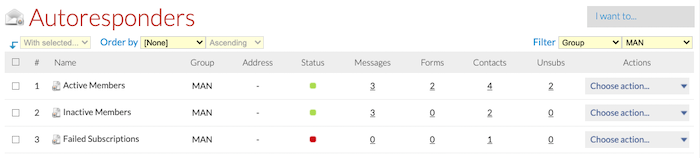
Tip! Instead of moving the failed subscriptions from the Active Members autoresponder to the Failed Subscriptions autoresponder, you also have the option to just delete their entire contact records from system after adding their email addresses to the suppression list. To do so, just create another action (e.g., FailedSubs: Delete) with the ‘Action‘ type set as ‘Delete contact‘ and also add that new action (FailedSubs: Delete) to the ‘Scheduled Actions‘ list on Step #6. To guarantee that the action to add them to the suppression list is processed prior to the system deleting their contact records, add the actions on the ‘Scheduled Actions‘ list separately. The first being the FailedSubs: Suppression List action, then the FailedSubs: Delete action.

Remove unsubscribers from an autoresponder

How do I remove contacts with cancelled subscriptions from an autoresponder?

There are a lot of things you can do with your unsubscribers, such as:

Attempt to reactivate their engagement to your program
Offer other products they might be interested in instead
Add them to the suppression list altogether

… and so on.

Here is a possible scenario:

You have an autoresponder (Active Members) that serves as a newsletter for active members of your organization.

You want to filter the contacts who unsubscribed to that autoresponder (Active Members) and move them to another autoresponder (Inactive Members) you’ve just set up in an attempt to eventually reactivate their engagement to your organization.

This is how to do it:

1. Create the Inactive Members destination autoresponder (See How to create autoresponders)

2. Filter your contacts to show only those that unsubscribed to the Active Members autoresponder

You can either click on the ‘Unsubs‘ count:

… or choose ‘Unsubscribed‘ / Active Members from the ‘Filter‘ menu on the Contacts list screen:

3. Once the filter is in place, click on the ‘I want to…‘ drop-down menu and select ‘Edit matching contacts

4. On the ‘Edit Matching Contacts‘ screen, select the following under the ‘Subscription‘ section:

  • For autoresponder: Active Members (the originating autoresponder – where you are removing them from)
  • Move to this autoresponder: Inactive Members (the destination autoresponder – where you are transferring them to)
  • Last message sent: 0 (so they’ll begin their subscription to the destination autoresponder from the beginning)
  • Status: Active
  • Change all the other fields as necessary and save your changes

Once done, the unsubscribers from the Active Members autoresponder will already be on the Inactive Members autoresponder:

Tip! If you want to preserve the status of their subscriptions to the originating autoresponder (Active Members) for records purposes, you may simply add a new subscription to the destination autoresponder (Inactive Members) instead of moving them out of the originating autoresponder. To do so, simply use the ‘Trigger Action for matching contacts‘ feature (See How to update contacts in bulk).

Add videos to messages

How do I embed a video to my message?

Adding videos to your messages allows you to get your messages across more quickly and easily, specially in this day and age, where people are more inclined to watch a video than read a lengthy message.

This is how to do it:

If you are technically savvy enough and comfortable with HTML, you can look into embedding your video to your message using HTML5.

Just like with adding an image, your video needs to be “sourced” on any platform that hosts videos and allows them to be embedded in emails.

It is important to note though that playback will still depend on whether the email client/service provider of the recipient supports it.

The best alternative, and our recommendation, is to use image hyperlinks rather than embedding the videos. An image hyperlink is an image/picture that links to the video when clicked by the reader. The image, in this case, would normally be expected to look like it was the thumbnail for the video.

Helpful resources:

https://www.w3schools.com/html/html5_video.asp
https://www.w3schools.com/html/html_images.asp