Actions and events provide some of the most powerful, unique, and flexible capabilities of arpReach as they are at the heart of your email marketing automation capabilities.
They allow you to create an unlimited number of triggers that automate one or many actions or events when activated.
Example: When a contact clicks a single trackable link within an email that you send, arpReach can automatically add a contact tag, remove a different contact tag, change the contact category, update a custom field value, drop one subscription, and add a different subscription.
As you can imagine, this gives you virtually unlimited options to manage your contacts list to build trust and maximize your profitability.
In this section, we provide a basic overview of how to create triggered actions and events and the options available to you. You are encouraged to read this section thoroughly to understand your basic options and then experiment with actions and events.
Creating / Editing an Action
Actions are simple to manage but do require some thought about what you want to do/achieve when they are triggered.
For any action, the name and description can be changed at any time without affecting anything else. However, once an action is created and in production, we do not advise you to change the Event type or triggered Action as this could lead to unpredictable results.
When creating and editing an action, the settings are the same.
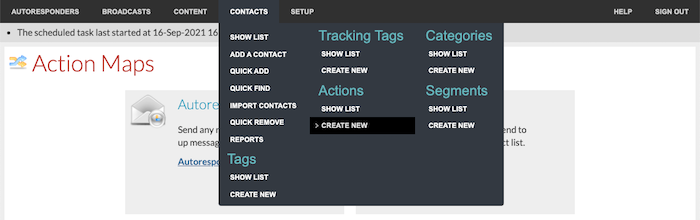
To create a new action, go to Contacts / Actions / Create New:
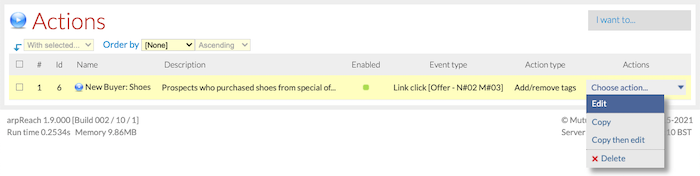
… or choose Create an action from the I want to… drop-down menu on the Actions list screen:

To edit an existing action, choose Edit from the Actions column on the Actions list screen:
Settings
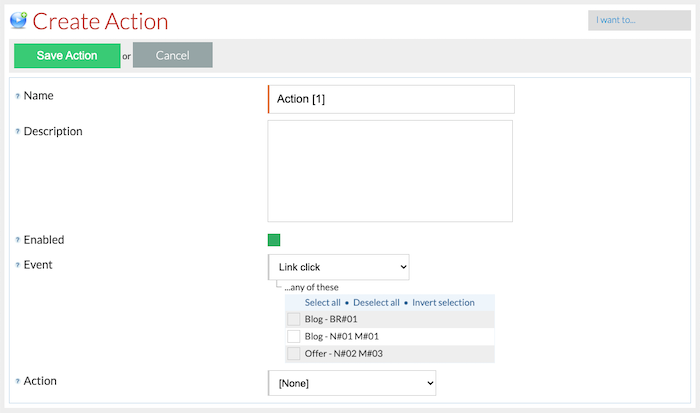
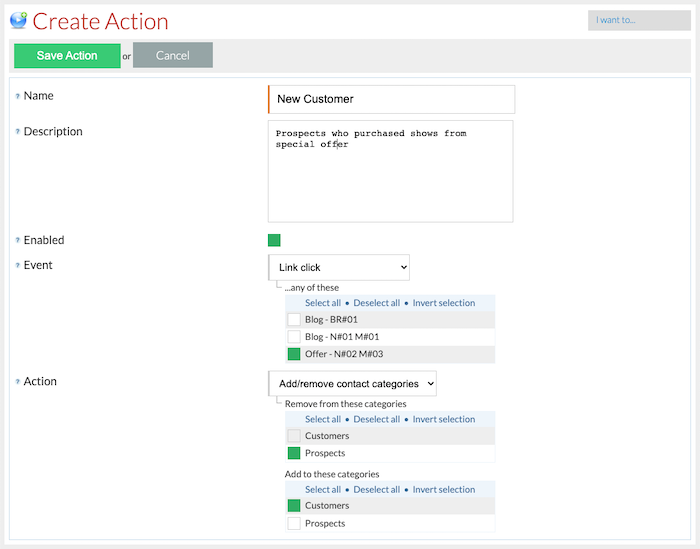
- Name – the name for the action. Every action has its own unique name for easy management.
- Description – a description for the action. This is never displayed to contacts.
- Enabled – check this to enable the action.
- Event – choose the type of event that will trigger this action.
— Link click – when selected, all of the available links will appear. Check the box for one or more of the trackable links that when clicked should trigger the action.
— Broadcast open – when selected, the subject line of all of your broadcasts will appear. Check the box for one or more that when opened should trigger the action. Note: This does not work with text only messages.
— Follow-up message open – when selected, the subject line of all of your autoresponder sequence messages will appear. Check the box for one or more that when opened should trigger the action. Note: This does not work with text only messages.
— Single email open – when selected, the subject line of all of your single email messages will appear. Check the box for one or more that when opened should trigger the action. Note: This does not work with text only messages.
— Subscription form submit – when selected, the name of all of your forms for all of your autoresponders will appear. Check the box for one or more forms that when used should trigger the action.
— Remote call – this is an advanced function triggered by a custom code or webhook.— Subscription created (#V2-exclusive) – when selected, the name of all your autoresponders will appear. Check the box for one or more of the autoresponders that when cancelled should trigger the action.
— Subscription cancelled (#V2-exclusive) – when selected, the name of all your autoresponders will appear. Check the box for one or more of the autoresponders that when cancelled should trigger the action.
— ‘Cancel All subscriptions’ requested (#V2-exclusive) – a ‘Cancel All subscriptions’ request should trigger the action.
— ‘Do not mail’ requested (#V2-exclusive) – a ‘Do not mail’ request should trigger the action.
— Soft bounce received (#V2-exclusive) – a soft bounce should trigger the action.
— Hard bounce received (#V2-exclusive) – a hard bounce should trigger the action.
— Spam complain received (#V2-exclusive) – a spam complain should trigger the action. - Action – choose the type of action that will be triggered when the event occurs.
— Add/remove tags
— Add/remove contact categories
— Add subscription
— Drop subscriptions
— Drop all subscriptions
— Delete subscriptions
— Delete all subscriptions
— Send email
— Send HTTP post
— Add to suppression list
— Remove from suppression list
— Add to ban list
— Remove from ban list
— Delete contact
— Change standard field value
— Change custom field value— Run user function (#V2-exclusive) – call your own PHP functions by putting them in the user_functions.php file in your installation’s /user_functions directory.
Important Note: Prior to using an action in your production environment, always test it to ensure that what you expect to happen does.
Use Case Example
Let’s suggest that, as part of a campaign targeting prospects who like shoes, your contact makes a purchase and clicks a link to confirm a purchase order.
When your contact performs the event Link click – “Offer – N#02 M#03”, the automated action will then remove the contact tag “Likes Shoes” and add the tag “Bought Shoes”.
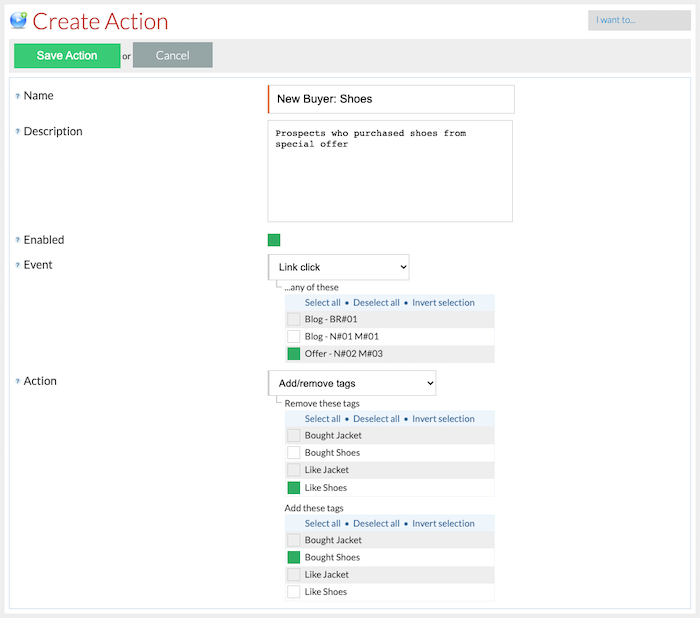
Because you can stack multiple actions to events, you can create a second event that is actioned when the same link is clicked. For this example, you can also change your contact’s category from “Prospect” to “Customer”.