The options for creating and editing a broadcast are identical. Note that you cannot edit a running broadcast or one that has already been sent.
To create a new broadcast, choose Broadcasts / Schedule a Broadcast from the menu bar:

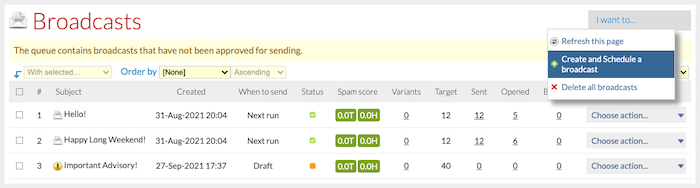
… or choose Create and Schedule a broadcast from the I want to… menu on the broadcast queue screen:
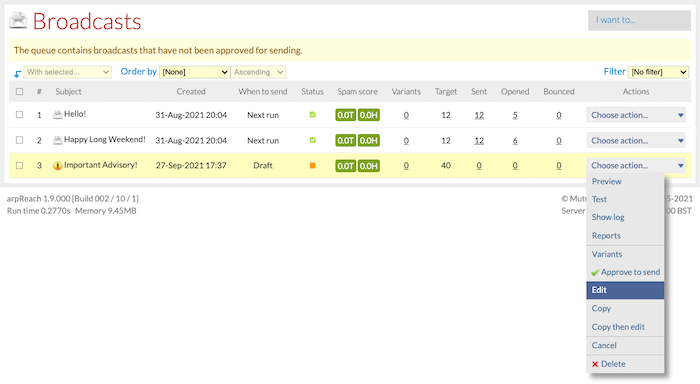
To edit an existing broadcast, choose Edit from the Choose action… drop-down menu.
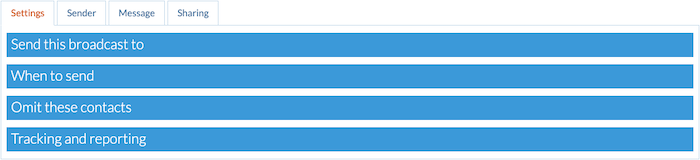
The Settings Tab
“Use segments to precisely target the contacts to receive your broadcasts”
Send this broadcast to Section

- Recipients – choose the recipients of the broadcast.
– All contacts
– Autoresponder subscribers
– Contact category members
– Have tracking tag (in a subscription)
– In segment (defined in Contacts / Segments)
– Has tag
When to send Section

Note that the date and time to send a broadcast is based on the server date and time with the timezone applied as set in Setup / System Settings / System / General.
- When to send – choose the scheduling option for the broadcast.
— Draft – the message will not be sent. Use this to work on broadcasts that are not yet ready for full scheduling.
— Next run – the broadcast will be sent during the next run of the scheduled task.
— Specific date and time – the broadcast will be sent during the first run of the scheduled task after the date and time set.
— Monday to Sunday – the broadcast will be sent during the first run of the scheduled task on the day specified. - Approved for sending – broadcast must be approved for sending before they will be sent. Use permission profiles to define which users can approve broadcasts. All administrator-level users can approve broadcasts.
Omit these contacts Section
“If you want to send your broadcast only to contacts who have confirmed a subscription, check that box in the Omit These Contacts section”

- Omit contacts whose subscriptions are all cancelled – the broadcast will not be sent to contacts who have cancelled all of their subscriptions.
- Omit contacts who have no confirmed subscriptions – the broadcast will not be sent to contacts who have never confirmed any subscription whether or not the autoresponders they are subscribed to currently require subscription confirmation.
- Omit contacts whose subscriptions have all failed – the broadcast will not be sent to contacts whose subscriptions have all failed due to a hard bounce or multiple soft bounces.
#V2-exclusive: Advanced omission settings
The Omit these contacts section in #V2 has additional options that greatly improve your capability to send precisely targeted messages based on your contact’s engagement with emails you have previously sent.
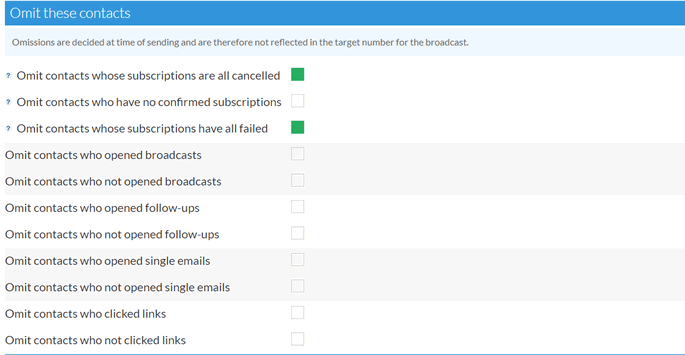
The additional options are:
- Omit contacts who opened broadcasts – the broadcast will not be sent to contacts who have opened (selected) previous broadcasts.
- Omit contacts who not opened broadcasts – the broadcast will not be sent to contacts who have not opened (selected) previous broadcasts.
- Omit contacts who opened follow-ups – the broadcast will not be sent to contacts who have opened (selected) follow-up messages.
- Omit contacts who not opened follow-ups – the broadcast will not be sent to contacts who have not opened (selected) follow-up messages.
- Omit contacts who opened single emails – the broadcast will not be sent to contacts who have opened (selected) single emails.
- Omit contacts who not opened single emails – the broadcast will not be sent to contacts who have not opened (selected) single emails.
- Omit contacts who clicked links – the broadcast will not be sent to contacts who have clicked (selected) links.
- Omit contacts who not clicked links – the broadcast will not be sent to contacts who have not clicked (selected) links.
Placing a checkmark in the box of the chosen option opens up a new section allowing you to select from the available choices.
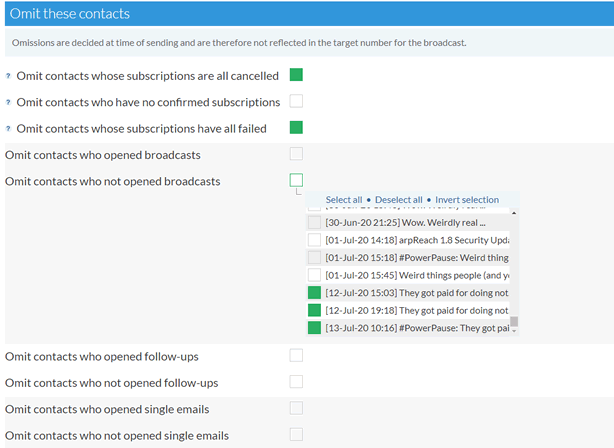
In the example above, the broadcast will be sent to all active contacts who did NOT open the selected previous broadcasts (e.g., sending to unopeners).
Tracking and reporting Section

- Track open rate for HTML and multi-part messages – check this box to turn on open rate tracking. The technology of email does not allow the open rate of plain text messages to be tracked.
The Sender Tab
Email system Section

- Send with this email system – choose the email system that will be used to send this broadcast.
From and reply-to Section
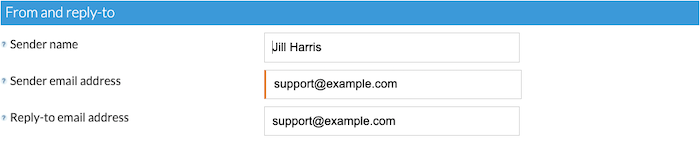
- Sender name – enter the name of the broadcast sender.
- Sender email address – enter the email address of the broadcast sender.
- Reply-to email address – enter the reply-to email address of the broadcast sender.
Persona Section

- Send with this persona – choose the persona of the broadcast sender.
The Message Tab
Content Section
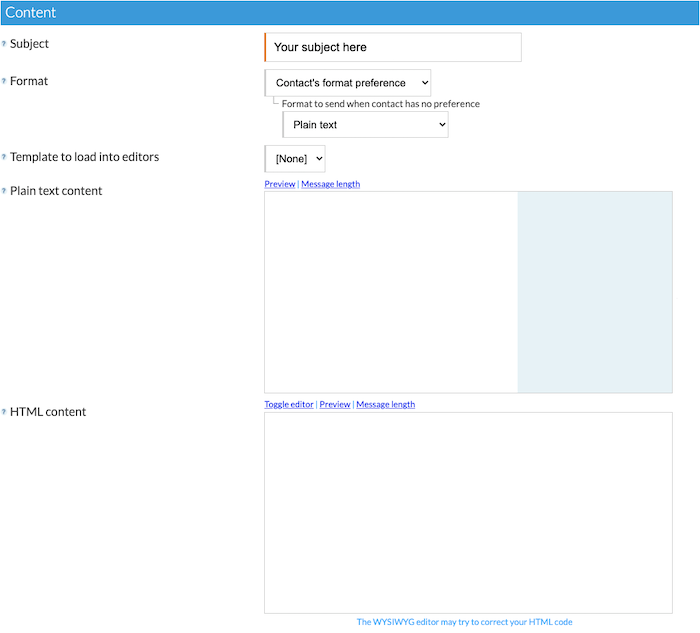
- Subject – enter the broadcast subject.
- Format – choose the format of the broadcast.
- Template to load into editors – choose a template to load into the plain text and HTML editors from your library of pre-created templates (as defined in Content / Templates)
- Plain text content – enter the plain text copy of the broadcast message.
- HTML content – enter the HTML content of the broadcast message. Click the Toggle editor link for a full HTML editor.
Layout Section
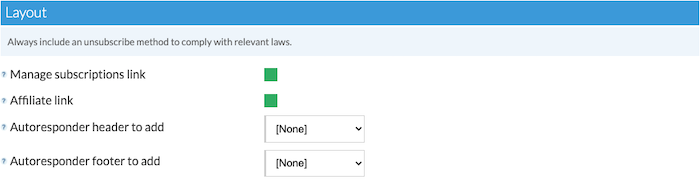
“Use the Layout section to add pre- created headers, footers and links”
- Manage subscriptions link – check this box to add a link to the screen where the contact can manage their subscriptions.
- Affiliate link – check this box to add your Powered by arpReach affiliate link to the message.
- Autoresponder header to add – choose an autoresponder’s header to add at the start of the message.
- Autoresponder footer to add – choose an autoresponder’s footer to add at the end of the message.
Attachments Section

- Files to attach to message – check the files from the attachment library (defined in Content / Attachments) that you want to attach to the broadcast message.
The Sharing Tab
In this section, you can opt to share your broadcast by using the system’s Broadcast Archives functionality.
Archives Section

- Include in these archives – check the broadcast archives (as defined in Broadcasts / Archives) that you want this broadcast to be included in. A broadcast can appear in as many of your broadcast archives as you want (or none of them).
- Format to archive – choose the format to show in the broadcast archive. You must have entered copy of the chosen format.
— Plain text – show the plain text version in the archive.
— HTML – show the HTML version in the archive.