Broadcast Archives

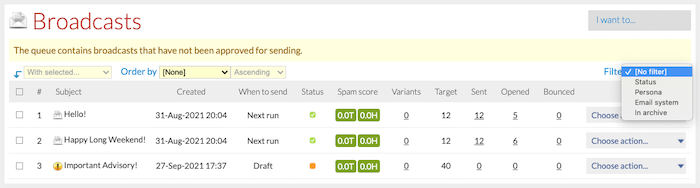
Broadcast archives allow you to make your broadcast content available online and share it on social networks, via bookmark sites, and by RSS. Each broadcast can belong to as many of your broadcast archives as you wish.

“Archives make your broadcast content available online for sharing by social media and bookmarking sites”

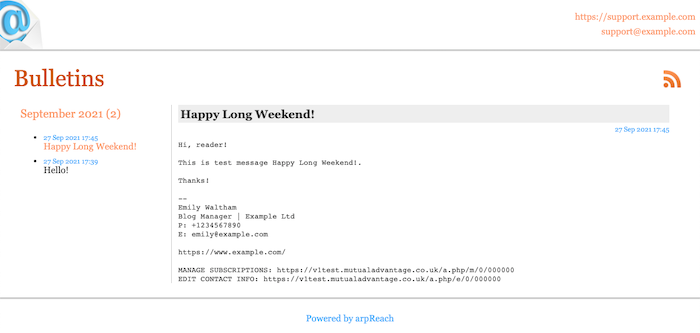
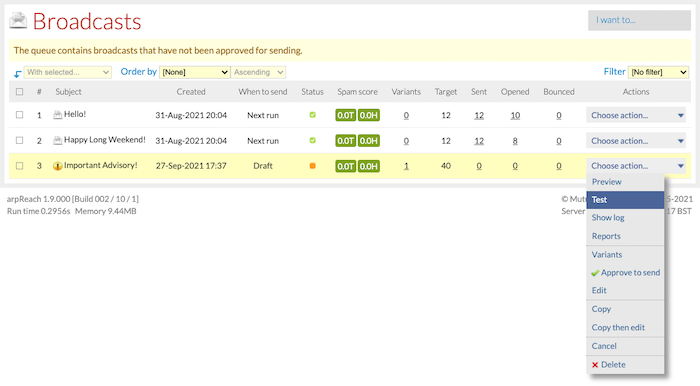
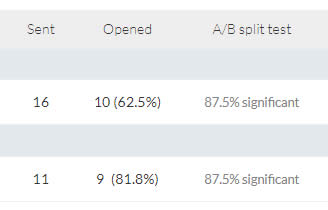
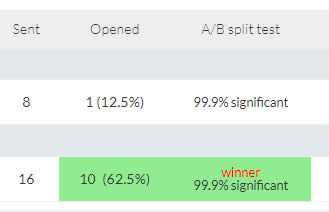
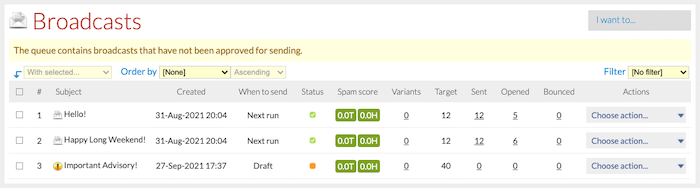
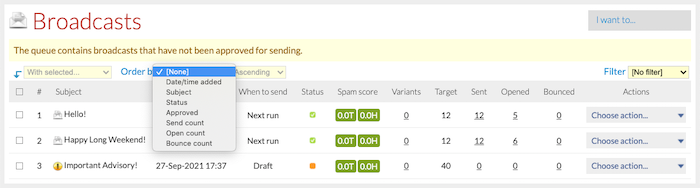
The above image shows a screenshot of a broadcast archive containing two (2) broadcasts. Broadcasts are automatically grouped by month and year.

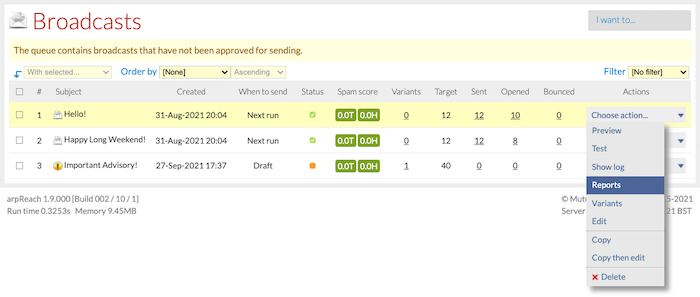
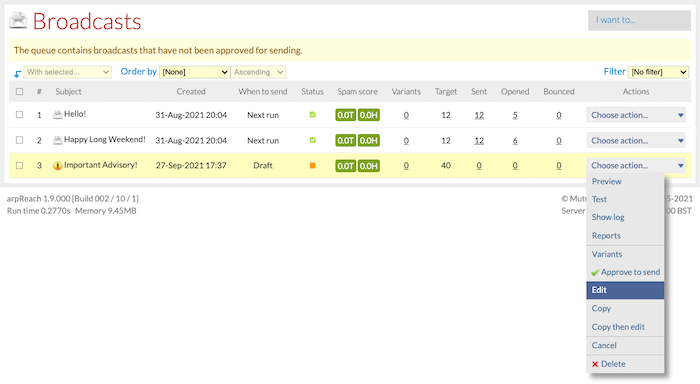
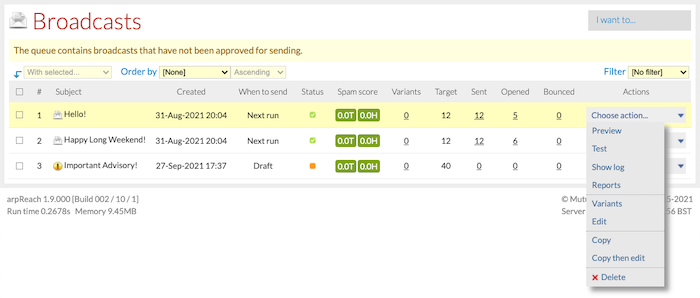
To manage your broadcast archives, choose Broadcasts / Archives / Show List from the menu bar.

Click the Link or RSS icon to open the archive in a new browser tab or window.

You can then copy the URL from the browser’s URL bar for use on websites, blogs, emails, and social network status updates.

Creating / Editing a Broadcast Archive

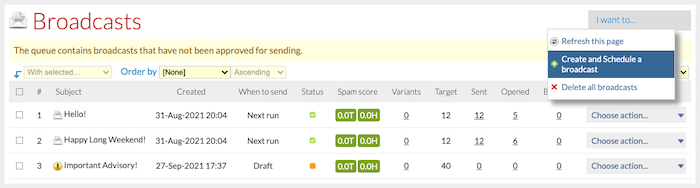
To create a broadcast archive, choose Broadcasts / Archives / Create New from the menu bar:

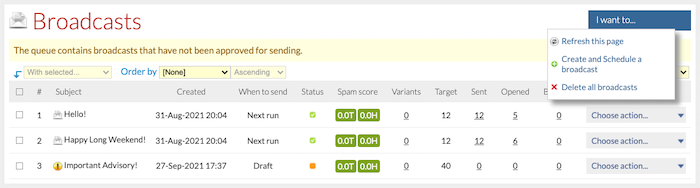
… or choose Create an archive from the I want to… menu on the Broadcast Archives list screen:

When creating or editing a broadcast archive, the options are the same.

“Broadcasts must remain in the broadcast queue to appear in archives”
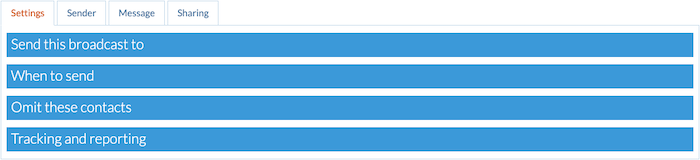
The Settings Tabs

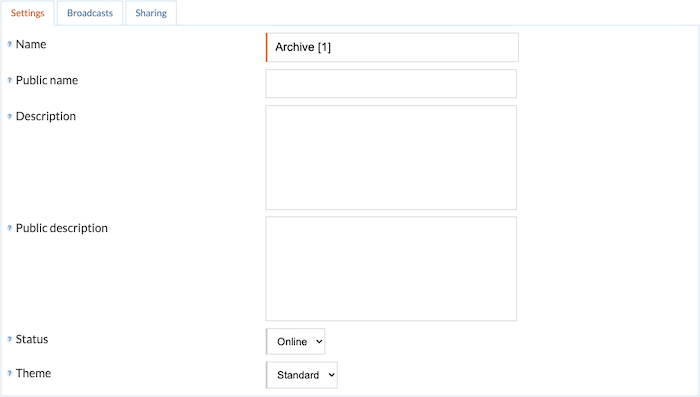
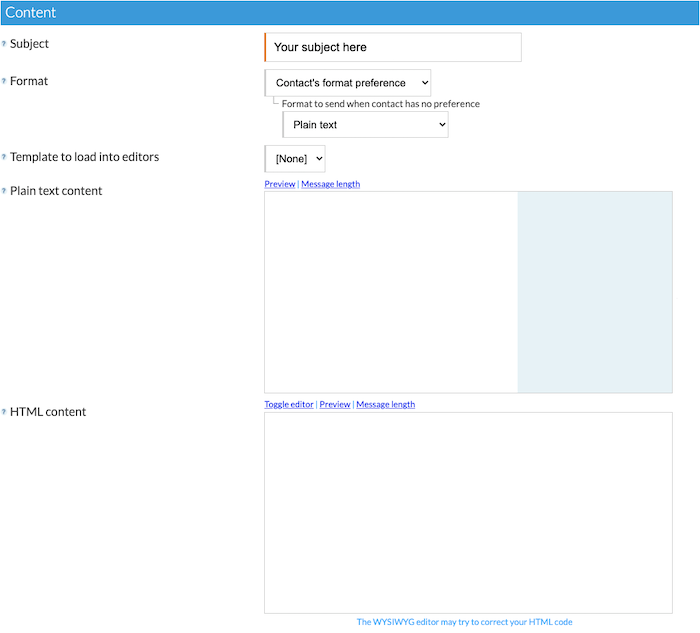
  • Name – a name for the archive. This is for your use and does not appear on the archive itself.
  • Public name – this is the name of the archive as it will appear on the archive itself. Leave this blank for no name to appear.
  • Description – this is a private description of the archive. It does not appear on the archive itself.
  • Public description – this description appears on the archive. Leave blank for no description to appear.
  • Status – choose the online and offline status of the archive. The archive can be viewed only when the status is online.
  • Theme – choose a theme for the archive as defined in Setup / System Settings / System / Contact Screens.
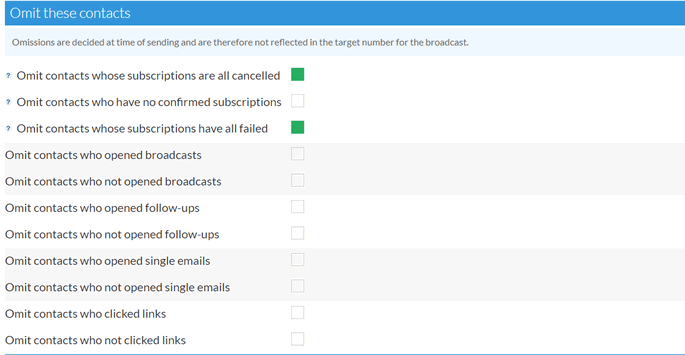
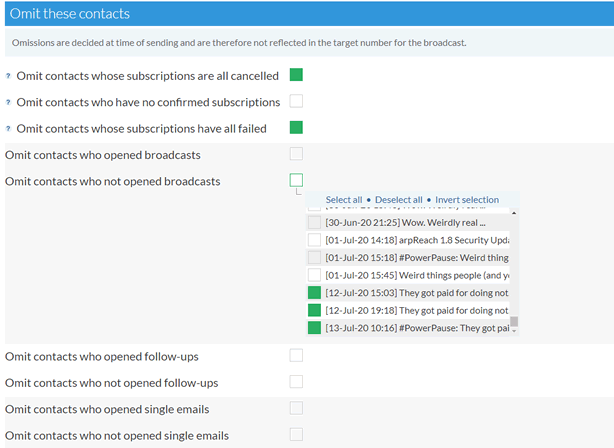
The Broadcasts Tab

  • Broadcasts in archive – choose the broadcasts that will appear in this archive. Only broadcasts that remain in the broadcast queue will appear in the archive.
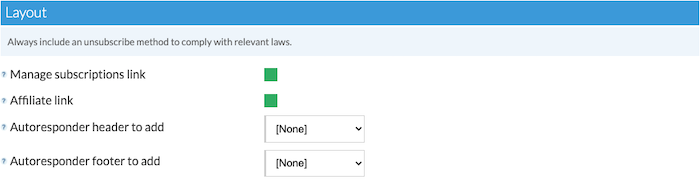
The Sharing Tab

  • Enable sharing – check this box to enable social bookmark sharing icons in the archive. You need to sign up with a social bookmarking site such as AddThis.com and grab the HTML code from their site to paste into arpReach. These sites usually allow you to specify which web page their links will lead to. From the HTML code they give you to do that, you need to insert {url} instead of an actual URL so that arpReach can insert the correct link to the broadcast.
    Here is an example code showing the use of {url} in HTML code supplied by the AddThis.com social bookmark site. This code is pasted into the Share/bookmark code box and will make the sharing options available in the archive view.
<!-- AddThis Button BEGIN -->
<div class=”addthis_toolbox addthis_default_ style” addthis:url=”{url}”>
<a class=”addthis_button_facebook_like” fb:like:layout=”button_count”></a>
<a class=”addthis_button_tweet”></a>
<a class=”addthis_button_google_plusone” g:plusone:size=”medium”></a>
<a class=”addthis_counter addthis_pill_style”></ a>
</div>
<script type=”text/javascript” src=”http:// s7.addthis.com/js/250/addthis_widget. js#pubid=ra-4f3d20933f35102a”></script>
<!-- AddThis Button END -->
  • Enable RSS feed – check this box to enable the RSS icon on the archive screen so that visitors can add the archive’s RSS feed to their RSS reader or browser.

“Search the social bookmarking site for ways of promoting a custom URL then insert {url} so arpReach can link to the correct broadcast”

Broadcast Reports

Various real-time graphs are available during the sending of a broadcast and when completed.

To access those graphs, choose Reports from the Choose action… drop-down menu on the Broadcasts list screen.

The available graphs are:

  • Overview – a pie chart showing the percentages of opened, not opened, and bounced.
  • Variant success – a pie chart showing the open-rate success of the main message versus its variants.
  • Total opens over [6 hours to 14 days]
  • Variant opens over [6 hours to 14 days]

Broadcast Log

Depending on the settings of your email systems as defined in Setup / Email Systems, broadcasts may be sent over more than one run of the scheduled task.

The Broadcast Log screen shows the progress of the broadcast as it goes out across those sessions.

To access the broadcast log, choose Show log from the Choose action… drop-down menu on the Broadcasts list screen.

Testing a Broadcast

You can send yourself a test of a broadcast (and any of its variants) to check its content and layout prior to setting its final scheduling.

Choose Test from the Choose action… drop-down menu on the Broadcasts (or Broadcast Variants) list screen.

“Send yourself a test while the broadcast is still in draft to check content, layout and formatting”

  • Recipient email address – enter the email address where the test should be sent.
  • Format to send – choose the format of the test to be sent. You need to have entered a copy for the format chosen.
  • Also send these variants – if the broadcast has variants, you can have them sent to you also. Check the variants you want to be sent.

Split testing broadcasts

Split Testing Broadcasts Using Variants

Every broadcast can have any number of variants so that you can test out different aspects of a broadcast to compare their success. When a variant is first added to a broadcast, it is an exact copy of the original broadcast. It can then be tweaked to test items such as:

  • Subject
  • Format
  • Content
  • Layout
  • Attachments

#V2 Exclusive features – A/B Statistical Significance testing and improved reporting.  See below. 

To manage the variants of a broadcast, choose the Variants option from the Choose action… drop-down menu or click the number under the Variants column.

“Use variants to test various aspects of broadcasts against each other”

Once you have done so, this screen will appear:

To create your first split-test variant click on Add a variant to this message from the I want to… drop-down menu. This creates a copy of the original message as your first variant and opens up the message editor for the variant you have just created.

In the example image below, we changed the Subject line so we can split test the variant against the original.

You can change any aspect of the message. Once you have made your changes, click the Save Variant button.

You will then be redirected back to the Broadcast Variants list screen, which now shows the variant you just created.

In the image below, take a look at the Frequency column.

You can change the percentage of contacts to be sent each message using the slider in the Frequency column, as pointed out below.

The system decides at random during the sending process which message will be sent to each contact.

#V2 -Exclusive – Statistical Significance

What does ‘Statistically significant’ mean?

Statistically significant‘ means that the result is unlikely to be explained solely by chance or random factors.  i.e. you can rely on the result more than if it is not statistically significant.  There are factors and considerations where this is not the case which are outlined below.

Set up your split tests in the same way as outlined above.  The benefit of using #V2 will become apparent once your test has completed and you are looking at the results.

#V2 reporting will also display the words xx.x% Significant or put another way the level of confidence you can have in the winning result.

The winning test variant will be highlighted in green only when the statistical significance of the test result is over 90%.

statistical significance result


In the image above, the level of confidence that the ‘winner’ will improve conversions, compared to the original message, is 94.6%.

A/B Testing

Below we can see two images that relate to simple A/B testing.

A/B test result not statistically significant

In the image above we see that the second option has the higher open rate (81.8%). While the open rate of option 2 is better than the original, the statistical significance of the result is less than 90% (87.7%). Compare that to the image below…

A/B test result is statistically significant

In the image above we can see that again option 2 beat the control (option 1) with an open rate of 62.5% compared to option 1 (12.5%).  In this case the statistical significance was greater than 90% and #V2 highlighted the winner in green.

Note of caution:  Any statistician will point out that there needs to be enough data (sends) for the test to be 100% reliable.  Generally speaking the more you send the more reliable the result and the results of split tests sent to less than 250 contacts should be considered ‘indicators’.

Ultimately, a winning subject line is a winning subject line and providing you send another email with that subject line to like-for-like contacts, you can reasonably expect a winning subject line to be more effective.  That expectation increases once you know that it is statistically significant.

Creating / Editing a Broadcast

The options for creating and editing a broadcast are identical. Note that you cannot edit a running broadcast or one that has already been sent.

To create a new broadcast, choose Broadcasts / Schedule a Broadcast from the menu bar:

… or choose Create and Schedule a broadcast from the I want to… menu on the broadcast queue screen:

To edit an existing broadcast, choose Edit from the Choose action… drop-down menu.

The Settings Tab

“Use segments to precisely target the contacts to receive your broadcasts”

Send this broadcast to Section
  • Recipients – choose the recipients of the broadcast.
    – All contacts
    – Autoresponder subscribers
    – Contact category members
    – Have tracking tag (in a subscription)
    – In segment (defined in Contacts / Segments)
    – Has tag
When to send Section

Note that the date and time to send a broadcast is based on the server date and time with the timezone applied as set in Setup / System Settings / System / General.

  • When to send – choose the scheduling option for the broadcast.
    Draft – the message will not be sent. Use this to work on broadcasts that are not yet ready for full scheduling.
    — Next run – the broadcast will be sent during the next run of the scheduled task.
    — Specific date and time – the broadcast will be sent during the first run of the scheduled task after the date and time set.
    — Monday to Sunday – the broadcast will be sent during the first run of the scheduled task on the day specified.
  • Approved for sending – broadcast must be approved for sending before they will be sent. Use permission profiles to define which users can approve broadcasts. All administrator-level users can approve broadcasts.
Omit these contacts Section

“If you want to send your broadcast only to contacts who have confirmed a subscription, check that box in the Omit These Contacts section”

  • Omit contacts whose subscriptions are all cancelled – the broadcast will not be sent to contacts who have cancelled all of their subscriptions.
  • Omit contacts who have no confirmed subscriptions – the broadcast will not be sent to contacts who have never confirmed any subscription whether or not the autoresponders they are subscribed to currently require subscription confirmation.
  • Omit contacts whose subscriptions have all failed – the broadcast will not be sent to contacts whose subscriptions have all failed due to a hard bounce or multiple soft bounces.
#V2-exclusive: Advanced omission settings

The Omit these contacts section in #V2 has additional options that greatly improve your capability to send precisely targeted messages based on your contact’s engagement with emails you have previously sent.

v2 broadcast omit options

The additional options are:

  • Omit contacts who opened broadcasts – the broadcast will not be sent to contacts who have opened (selected) previous broadcasts.
  • Omit contacts who not opened broadcasts – the broadcast will not be sent to contacts who have not opened (selected) previous broadcasts.
  • Omit contacts who opened follow-ups – the broadcast will not be sent to contacts who have opened (selected) follow-up messages.
  • Omit contacts who not opened follow-ups – the broadcast will not be sent to contacts who have not opened (selected) follow-up messages.
  • Omit contacts who opened single emails – the broadcast will not be sent to contacts who have opened (selected) single emails.
  • Omit contacts who not opened single emails – the broadcast will not be sent to contacts who have not opened (selected) single emails.
  • Omit contacts who clicked links – the broadcast will not be sent to contacts who have clicked (selected) links.
  • Omit contacts who not clicked links – the broadcast will not be sent to contacts who have not clicked (selected) links.

Placing a checkmark in the box of the chosen option opens up a new section allowing you to select from the available choices.

Broadcast omit options 2

In the example above, the broadcast will be sent to all active contacts who did NOT open the selected previous broadcasts (e.g., sending to unopeners).

Tracking and reporting Section
  • Track open rate for HTML and multi-part messages – check this box to turn on open rate tracking. The technology of email does not allow the open rate of plain text messages to be tracked.

The Sender Tab

Email system Section
  • Send with this email system – choose the email system that will be used to send this broadcast.
From and reply-to Section
  • Sender name – enter the name of the broadcast sender.
  • Sender email address – enter the email address of the broadcast sender.
  • Reply-to email address – enter the reply-to email address of the broadcast sender.
Persona Section
  • Send with this persona – choose the persona of the broadcast sender.

The Message Tab

Content Section
  • Subject – enter the broadcast subject.
  • Format – choose the format of the broadcast.
  • Template to load into editors – choose a template to load into the plain text and HTML editors from your library of pre-created templates (as defined in Content / Templates)
  • Plain text content – enter the plain text copy of the broadcast message.
  • HTML content – enter the HTML content of the broadcast message. Click the Toggle editor link for a full HTML editor.
Layout Section

“Use the Layout section to add pre- created headers, footers and links”

  • Manage subscriptions link – check this box to add a link to the screen where the contact can manage their subscriptions.
  • Affiliate link – check this box to add your Powered by arpReach affiliate link to the message.
  • Autoresponder header to add – choose an autoresponder’s header to add at the start of the message.
  • Autoresponder footer to add – choose an autoresponder’s footer to add at the end of the message.
Attachments Section
  • Files to attach to message – check the files from the attachment library (defined in Content / Attachments) that you want to attach to the broadcast message.

The Sharing Tab

In this section, you can opt to share your broadcast by using the system’s Broadcast Archives functionality.

Archives Section
  • Include in these archives – check the broadcast archives (as defined in Broadcasts / Archives) that you want this broadcast to be included in. A broadcast can appear in as many of your broadcast archives as you want (or none of them).
  • Format to archive – choose the format to show in the broadcast archive. You must have entered copy of the chosen format.
    — Plain text – show the plain text version in the archive.
    — HTML – show the HTML version in the archive.

The Broadcast Queue

All sent and unsent broadcasts are held in the broadcast queue which is a central place where you manage all your broadcasts.

The above image shows the broadcast queue with three (3) broadcasts, one of which is not yet approved for sending.

From the menu bar, choose Broadcasts / Show Queue to view the broadcast queue.

The columns of data in the broadcast queue are:

  • Subject – the subject line of the broadcast.
  • Created – the date and time the broadcast was created.
  • When to send – the day, date, or time the broadcast will be sent.
  • Status – the status of the broadcast. Hover your mouse over the status icon for more information.
  • Spam score – the individual spam scores of the plain text (T) and HTML (H) messages.
  • Variants – the number of variants of the main message. Click the number to view those variants or add more.
  • Target – an estimated number of contacts the broadcast will be sent to calculated at the time the broadcast was created and prior to sending.
  • Sent – the number of contacts who have been sent the broadcast. Click this number to view those contacts.
  • Opened – the number of contacts who have opened the broadcast (HTML and multi-part only). Click this number to view those contacts.
  • Bounced – the number of contacts who bounced the broadcast. Click the number to view those contacts.

Note that the Target count doesn’t exclude contacts that are not sent the broadcast at the moment of sending for reasons such as:

  • They have unsubscribed
  • Their subscription has failed (multiple soft bounces or one hard bounce)

There is a setting in a broadcast that omits contacts whose subscriptions are all cancelled and whose subscriptions have all failed. Broadcasts will not be sent to these contacts.

Using the Order by drop-down menu, the queue can be sorted by:

  • Date/time added
  • Subject
  • Status
  • Approved
  • Send count
  • Open count
  • Bounce count

Using the With selected… menu, you can approve/disapprove or delete the selected broadcasts.

The Filter drop-down menu allows you to filter your list by these criteria:

  • [No filter]
  • Status
  • Persona
  • Email system
  • In archive

Using the I want to… menu, you can:

  • Refresh the Broadcast Queue page
  • Create and scheduled a broadcast
  • Delete all broadcasts

“The options in the actions column of the broadcast queue change depending on the status of the broadcast”

The Choose action… menu has the following options:

  • Preview – view a preview of the broadcast in a new window. Your browser needs to allow popups for this.
  • Test – send a test broadcast to yourself to check content and formatting before final scheduling.
  • Show log – show the log of how this broadcast was sent out by the scheduled task.
  • Reports – show graphical reports on the success of this broadcast.
  • Variants – view the variant list for this broadcast. This shows the list of variants of the main message that are used in split-testing.
  • Edit – edit the broadcast settings, content, or layout.
  • Copy – make a copy of the broadcast to be scheduled for sending in its own right.
  • Copy then edit – make a copy of the broadcast to be scheduled for sending in its own right. Immediately go into the edit screen for the copy.
  • Delete – delete the broadcast from the queue.

Different options may appear at other times, such as when a broadcast is being sent.

  • Pause / Unpause – pause the broadcast. It will stop sending and remain in that state until unpaused when it will then resume when the scheduled task next runs.
  • Cancel – completely cancel a running broadcast. It cannot be resumed later.
  • Approve to Send – approve the broadcast for sending.

Broadcasts Overview

arpReach has a powerful broadcast feature that allows you to send “one-off” messages to your contacts independently of any follow-up messages they might be receiving.

For example, you might use the broadcast feature to send out a weekly offer to everyone in your sales sequence. Or you might choose to send a monthly newsletter to all your contacts.

Broadcast messages can be plain text, HTML, or multi-part (both plain text and HTML). You can choose to send a specific format or the format preferred by each contact.

For each broadcast, you can create variants of the main message to use for split-testing purposes. Changes that can be made to variants include subject, message copy, message format, layout, and attachments.

With so many options available, it is a good idea to practice sending broadcast messages to a small number of your own email addresses to familiarize yourself with the process.

In this section, you will discover how to create a broadcast message.

To view the Broadcast Action Map, click Broadcasts on the menu bar.