In this section, we discover how to set up your autoresponders in arpReach. Only once we have set up the autoresponder can we add our campaign messages and sequences, which we cover in the next section.
“Use autoresponders to create email campaigns to follow up with your prospects and contacts on auto-pilot”
Taking the time to look at and understand your options (and some of the available automation options) will help you increase your contact retention and build trust with your subscribers.
You have many basic and customization options available to you. Why just “do” when with a little extra effort you can do to impress 😉
Autoresponders list screen
Choose Autoresponders / Show List from the menu bar to show your list of autoresponders.

The columns in the table are:
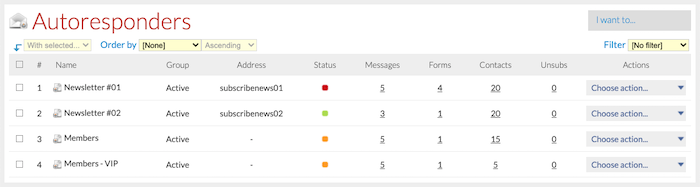
- Name – the unique name you have given this autoresponder.
- Group – the group (if any) to which this autoresponder belongs.
- Address – the incoming email address (if any) for this autoresponder which can be used to subscribe or unsubscribe by email.
- Status – the status of this autoresponder.
— Live – accepting new subscriptions and sending messages.
— Disabled – not accepting new subscriptions and not sending messages.
— Sending paused – accepting new subscriptions but not sending messages.
— Prevent new subscriptions – not accepting subscriptions but sending messages to existing subscribers. - Messages – the number of messages in the autoresponder’s follow-up sequence. Click on this number to view the messages list.
- Forms – the number of subscription forms you have created for this autoresponder. Click on this number to view the forms list.
- Contacts – the number of unique contacts who are subscribed to this autoresponder, regardless of their subscription status. Multiple subscriptions by individual contacts are not counted. Click this number to view the contacts who are subscribed to this autoresponder.
- Unsubs – the numbers of contacts who unsubscribed to this autoresponder. Click this number to view the contacts who unsubscribed to this autoresponder.
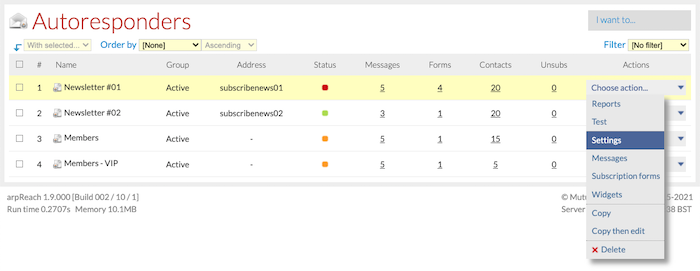
On the Choose action… menu for each autoresponder, you can:
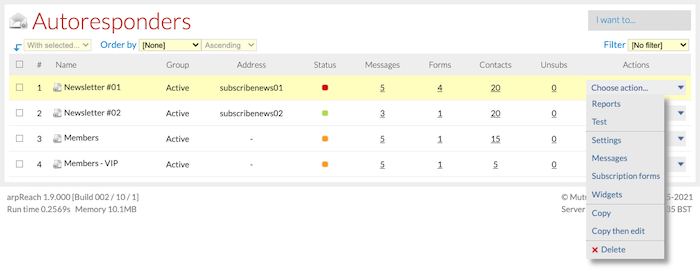
- Reports – view subscription reports.
- Test – send yourself test follow-up messages.
- Settings – edit its settings.
- Messages – view and manage its follow-up messages.
- Subscription forms – view and manage its subscription forms.
- Widgets – get HTML code to display a small image on your website showing how many subscribers an autoresponder has.
- Copy/Copy then Edit – copy this autoresponder and all its follow-up messages.
- Delete – delete this autoresponder and all its follow-up messages.
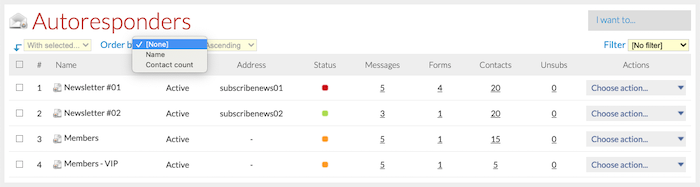
You can sort your autoresponder list by name and contact count using the Order by drop-down menu.
On the Autoresponders list screen, the With Selected… drop-down menu allows you to:
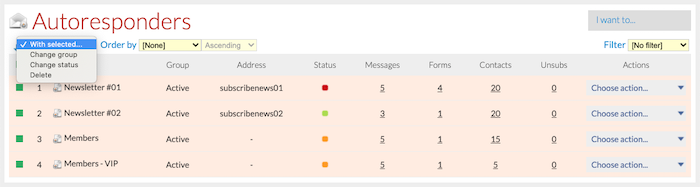
- Change the group of the selected autoresponders
- Change the status of the selected autoresponders
- Delete the selected autoresponders
The Filter drop-down menu allows you to filter the list by:
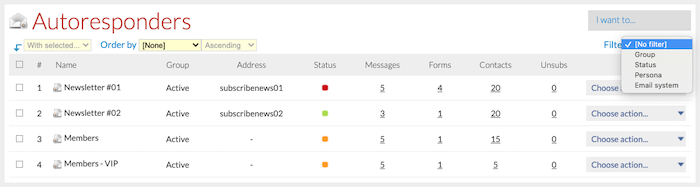
- Autoresponder group
- Status
- Persona
- Email system
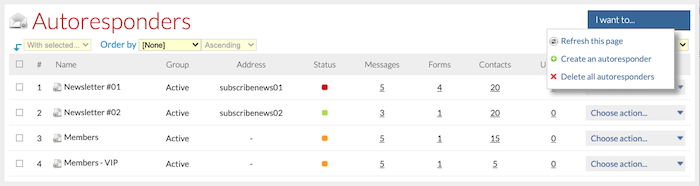
The I Want To… menu has options to create a new autoresponder and to delete all autoresponders.
Setting up an autoresponder
To create a new autoresponder campaign, go to Autoresponders / Create New:

When creating a new autoresponder or editing an existing one, the settings screens are the same.
To edit an existing autoresponder, go to the Autoresponders / Show List, locate the autoresponder, and choose Settings from the Choose action… drop-down menu.
The settings are spread across five (5) tabs and each tab will have one or more sections/panels. Each section has input fields that you will need to fill in or make choices about. While it may look daunting, it is simple, and you only need to complete the workflow when you create a new autoresponder campaign.
The tabs are:
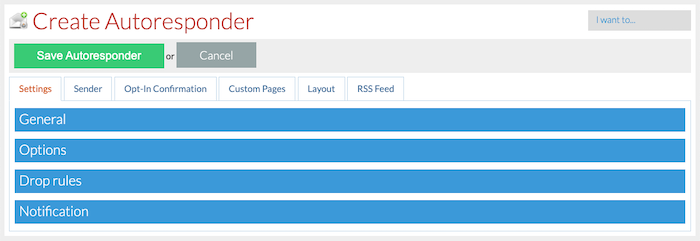
- Settings
- Sender
- Opt-In Confirmation
- Custom Pages
- Layout
- RSS Feed
Settings Tab
General Section
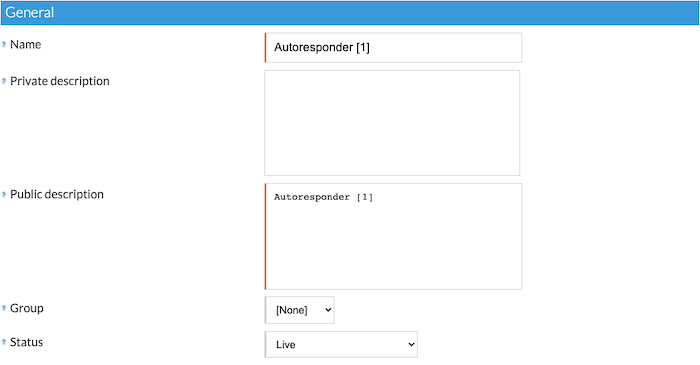
- Name – the unique name of the autoresponder.
- Private description – your private description of the autoresponder. This is not published.
- Public description – the published description of the autoresponder. This description may be displayed to contacts on their manage subscriptions page. Make sure you identify your autoresponder so that your contacts remember what they signed up for.
- Group – the autoresponder group (if any) to which the autoresponder belongs. None is the default.
- Status – the current status of the autoresponder. The available options are:
— Live – new subscriptions will be accepted and due follow-up messages will be sent.
— Disabled – no new subscriptions will be accepted and no due follow-up messages will be sent.
— Sending paused – new subscriptions will be accepted but no due follow-up messages will be sent.
— Prevent new subscriptions – no new subscriptions will be accepted but due follow-up messages will be sent.
Options Section
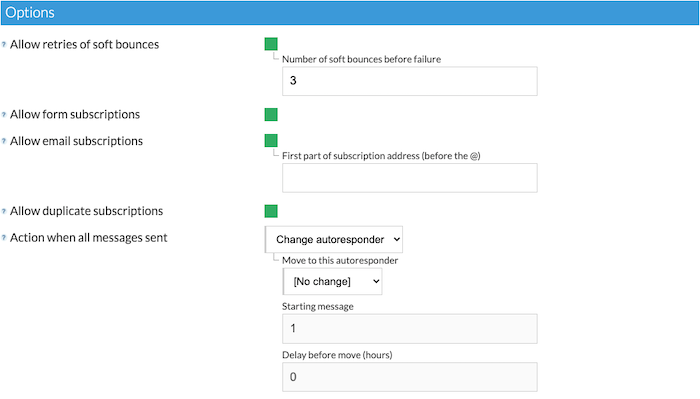
- Allow retries of soft bounces – check this to resend follow-up messages that soft-bounce and set the number of soft bounces allowed before the subscription is flagged as failed. Three (3) is the default.
- Allow form subscriptions – check this box to allow contacts to subscribe through a subscription form on a website. Most people will want this option available.
- Allow email subscriptions – check this box to allow contacts to subscribe by sending a blank email to the subscription address. Contacts can also unsubscribe by entering “unsubscribe”, “remove”, “leave”, “stop” or “delete” in the subject line of the email.
For example, if you want info@example.com to trigger a subscription, enter info as the First part of the subscription address. Subscriptions can be accepted using the To: or CC: fields, but not the BCC: field. You can use forwarders from other domains to trigger subscriptions. Only the first part of the email address needs to match. Accepting subscriptions by email requires that the scheduled task is correctly set up to monitor the email address where emailed subscriptions arrive. - Allow duplicate subscriptions – check this box to allow one contact to subscribe to this autoresponder multiple times. An email address can only appear once in the contact list but each contact may have multiple subscriptions to each autoresponder.
- Action when all messages sent – choose the action to happen when the contact reaches the end of the autoresponder’s follow-up sequence. The available options are:
— Set to finished – the status of the subscription will be changed to Finished. If new messages are added to the sequence, they will not be sent to the contact.
— Remain active – the status of the subscription will remain as Active. If new messages are added to the sequence, the contact will be sent the new messages (this is recommended in most cases).
— Change autoresponder – move the contact’s subscription to a new autoresponder. Choose the autoresponder the contact will be moved to, the starting message number, and the delay before the move happens. With this option, the original subscription no longer exists, so the contact will no longer receive any new messages added to the original autoresponder.
Drop rules Section
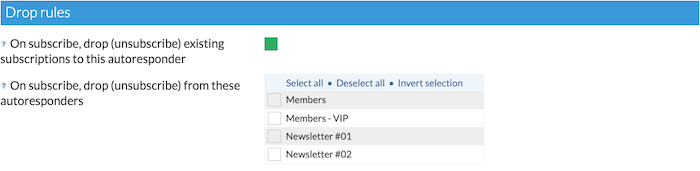
- On subscribe, drop (unsubscribe) existing subscriptions to this autoresponder – ensures that a contact’s existing subscription to the autoresponder is cancelled when a new one is created. You would use this option to stop a subscriber from receiving multiple emails from the same autoresponder (e.g., messages 1 and 5 and 7 in potentially the same week or day). (See also Allow duplicate subscriptions above)
- On subscribe, drop from these autoresponders – choose which subscriptions to other autoresponders will be cancelled when a new subscription to this autoresponder is created.
Notification Section
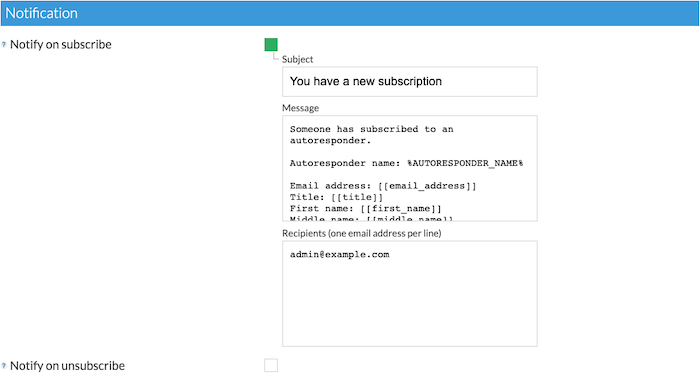
- Notify on subscribe – choose this option to send a notification email when someone subscribes to the autoresponder.
— Subject – the subject of the subscribe notification email.
— Message – the content of the subscribe notification email.
— Recipients – email addresses of people that will be sent the subscribe notification emails, entered one email address per line.— Reply-To: subscriber [[email_address]] (#V2-exclusive) – check this box to add a Reply-To: header with the subscriber’s email address to subscribe notification emails. - Notify on unsubscribe – choose this option to send a notification email when someone unsubscribes from the autoresponder.
— Subject – the subject of the unsubscribe notification email.
— Message – the content of the unsubscribe notification email.
— Recipients – email addresses of people that will be sent the unsubscribe notification emails, entered one email address per line.
The following tags are available for you to use in your notification emails:
%AUTORESPONDER_NAME% - to include the name of the autoresponder.
%EMAIL_ADDRESS% - to include the email address of the contact
%FULL_NAME% - to include the full name of the contact if the full name has been captured
#V2-exclusive: Custom fields in the subject line and recipients list
With #V2, you can use custom fields in the notification email subject line and recipients list.
For example, you may want to send a copy of the subscribe notification emails to your partners or referrers. In the Recipients list, you can enter:
admin@example.com
[[custom_referrer_email]]
… given that you have a custom field for referrer_email set in Content / Custom Fields / Show List.
#V2-exclusive: Persona as recipients
You can also add the following persona email address tag formats in the notification recipients list:
[[persona_email_address_1]]
[[persona_email_address_2]]
[[persona_email_address_3]]
[[persona_email_address_4]]
[[persona_email_address_5]]
This allows you to send the notification emails to the email addresses related to the persona you’ve set in the autoresponder’s Sender / Persona settings.
Sender Tab
Email System Section

- Send messages with this email system – from the drop-down choose an email system that will be used to send all messages from this autoresponder, including follow-ups and confirmation requests. Email systems are set-up and managed in Setup / Email Systems.
From and Reply-To Section
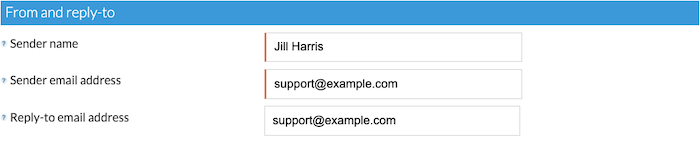
- Sender name – enter the “from” name of the sender of emails from this autoresponder.
- Sender email address – enter the “from” email address of the sender of emails from this autoresponder.
- Reply-to email address – enter the “reply-to” email address of the sender of emails from this autoresponder.
Persona Section

- Send with this persona – choose a persona to be used to personalize the messages sent by this autoresponder. This allows you to automatically populate your templates or emails with content such as name and company name, providing it has been added to the person record.
Personas are managed in Setup / Personas. Persona tags that you can insert to include information from the selected persona are listed on the Persona Tags page.
Opt-In Confirmation Tab

- Confirmation type – choose the type of subscription confirmation to be used for this autoresponder. This determines whether or not new subscribers will be required to confirm their subscription when they subscribe.The options you have are:
– No confirmation required – New subscribers are not required to confirm their subscription and will therefore start to receive the autoresponder’s follow-up messages.
– Use system confirmation email – New subscribers will be sent the system confirmation email as defined in Setup / System Settings / Opt-In Confirmation . The contact will need to click the “confirm” link in their confirmation email before they will receive any follow-up messages. (Also known as double opt-in.)
– Use custom confirmation email – New subscribers will be sent the custom confirmation email defined on this screen. Ensure that the email contains the tag {CONFIRM_LINK} as this will generate the link that the contact must click to confirm their subscription. No follow-up messages will be sent until the contact has confirmed their subscription. (Also known as double opt-in.)
For the custom confirmation type, you need to set the format to be sent, the subject and the plain text and HTML messages as appropriate. For HTML messages, click the Toggle editor link to view the HTML editor or enter raw HTML produced in an offline editor.
“Many screens use the HTML editor – click the toggle editor link to switch the editor on and off”
Custom Pages Tab
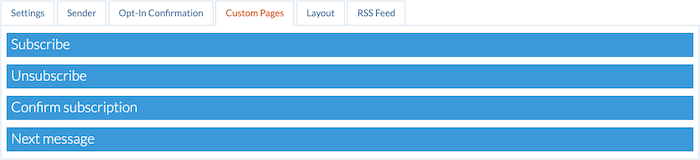
Custom pages are the web pages your contacts will be taken to and see when they perform one of eight actions:
- Subscribe successfully
- Fail to subscribe successfully
- Unsubscribe successfully
- Fail to unsubscribe successfully
- Confirm a subscription successfully
- Fail to confirm a subscription successfully
- Successfully request the next message in sequence
- Fail to successfully request the next message in sequence
“The precedence order for custom pages is tracking tag then subscription form then autoresponder”
Important: The following items in arpReach have custom page settings and the software will use them in the following precedence order:
- Tracking tag custom pages
- Subscription form custom pages
- Autoresponder custom pages
- Default system pages
Example 1
A contact subscribes via a subscription form that has a tracking tag in its settings and that tracking tag has custom pages defined in its settings, then the tracking tag’s custom pages will be used for that contact.
Example 2
A contact subscribes via a subscription form that has no tracking tag assigned to it but the subscription form has custom pages defined in its settings – the form’s custom pages will be used for that contact.
Example 3
A contact subscribes by email to an autoresponder that has custom pages defined in its settings. Those custom pages will be used for that contact.
Example 4
A contact subscribes by email to an autoresponder that has no custom pages defined in its settings. The system default pages will be used for that contact.
Each of the four sections has two options for you to add a URL into. Use is optional, but highly recommended.

- Success page – Enter the URL of the page to be displayed when a contact successfully completes the action required.
- Failure page – Enter the URL of the page to be displayed when an error results from a contact attempting to complete an action.
Layout Tab
The options in the layout tab define some general layout settings that will be applied to all follow-up messages in the autoresponder.
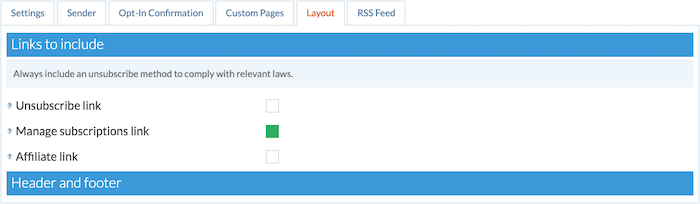
Links To Include Section
- Unsubscribe link – this will append an unsubscribe link to all messages in the autoresponder. The unsubscribe link applies only to this autoresponder and no other subscriptions are affected.
- Manage subscriptions link – append a link that allows the contact to manage all their subscriptions on one screen.
- Affiliate link – This will automatically append your arpReach affiliate link to all follow-up messages in the autoresponder. This can be managed from Setup / System Settings / Affiliate Program.
Header and Footer Section
Here you can enter plain text and HTML versions of a header and footer to be used in conjunction with the templates you create within arpReach.
When defining each follow-up message in the autoresponder, you have the option of including the autoresponder’s header and/or footer. The software will automatically use the plain text or HTML version of the header or footer depending on the type of message being sent to the contact.
Headers and footers from autoresponders can also be added to broadcasts. In a broadcast’s settings, there is a drop-down where you can choose which autoresponder’s header and/or footer to use.
Tip!
- Create an autoresponder group called “Templates” to specifically use with your broadcast templates.
- Create an autoresponder called “My Template” (or whatever you think is appropriate).
- Set the autoresponder status (Autoresponder / Settings / General) to Disabled.
- Ignore all other tabs and settings except for Layout / Header and footer.
- Add your custom header and footer for each of your broadcast templates. This puts all of your template headers and footers in one, easy to edit place. This also ensures that if you change a live autoresponder’s header and/or footer, your broadcast template will still look the same. Yes, it’s a bit more work, but it will save you time and effort in the long run!
RSS Feed Tab
You can allow your contact to receive their follow-up messages into an RSS feed, as well as by email. To allow this, check the RSS feed enabled box and enter the RSS channel settings for the autoresponder. To disable this feature, uncheck the box.
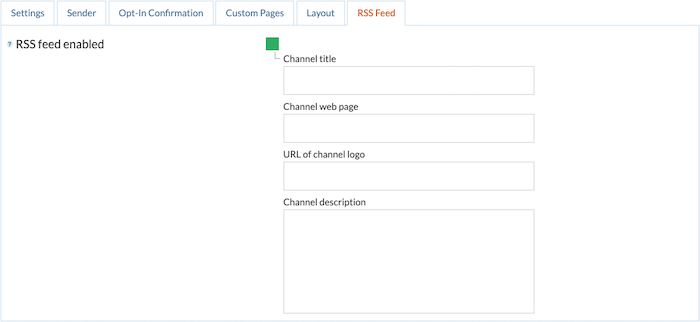
- Channel title – enter the title for the RSS feed channel. If left blank, the autoresponder’s public description is used.
- Channel web page – enter the URL of the web page for the RSS feed channel.
- URL of channel logo – enter the URL of your RSS feed channel’s logo.
Max size is 144 px wide x 400 px high.
Default size is 88 px wide x 31 px high. - Channel description – enter the description for the RSS feed channel. This can contain HTML. If left blank, the autoresponder’s public description is used.
You can inform your subscriber of the URL of their RSS feed by including the tag {RSS_FEED_LINK} in follow-up messages. Note that this tag does not work in broadcasts because broadcasts are not specific to individual autoresponders.